Design Mode extensions
This tutorial shows how to build and integrate an extension into Aurora’s Design Mode.
Private beta
- Beta product features will not be supported via our normal support channels (e.g., email).
- You may experience some gaps or changes as the product is refined and documentation updated.
- There may be some compatibility issues between our beta and generally available product.
How it Works
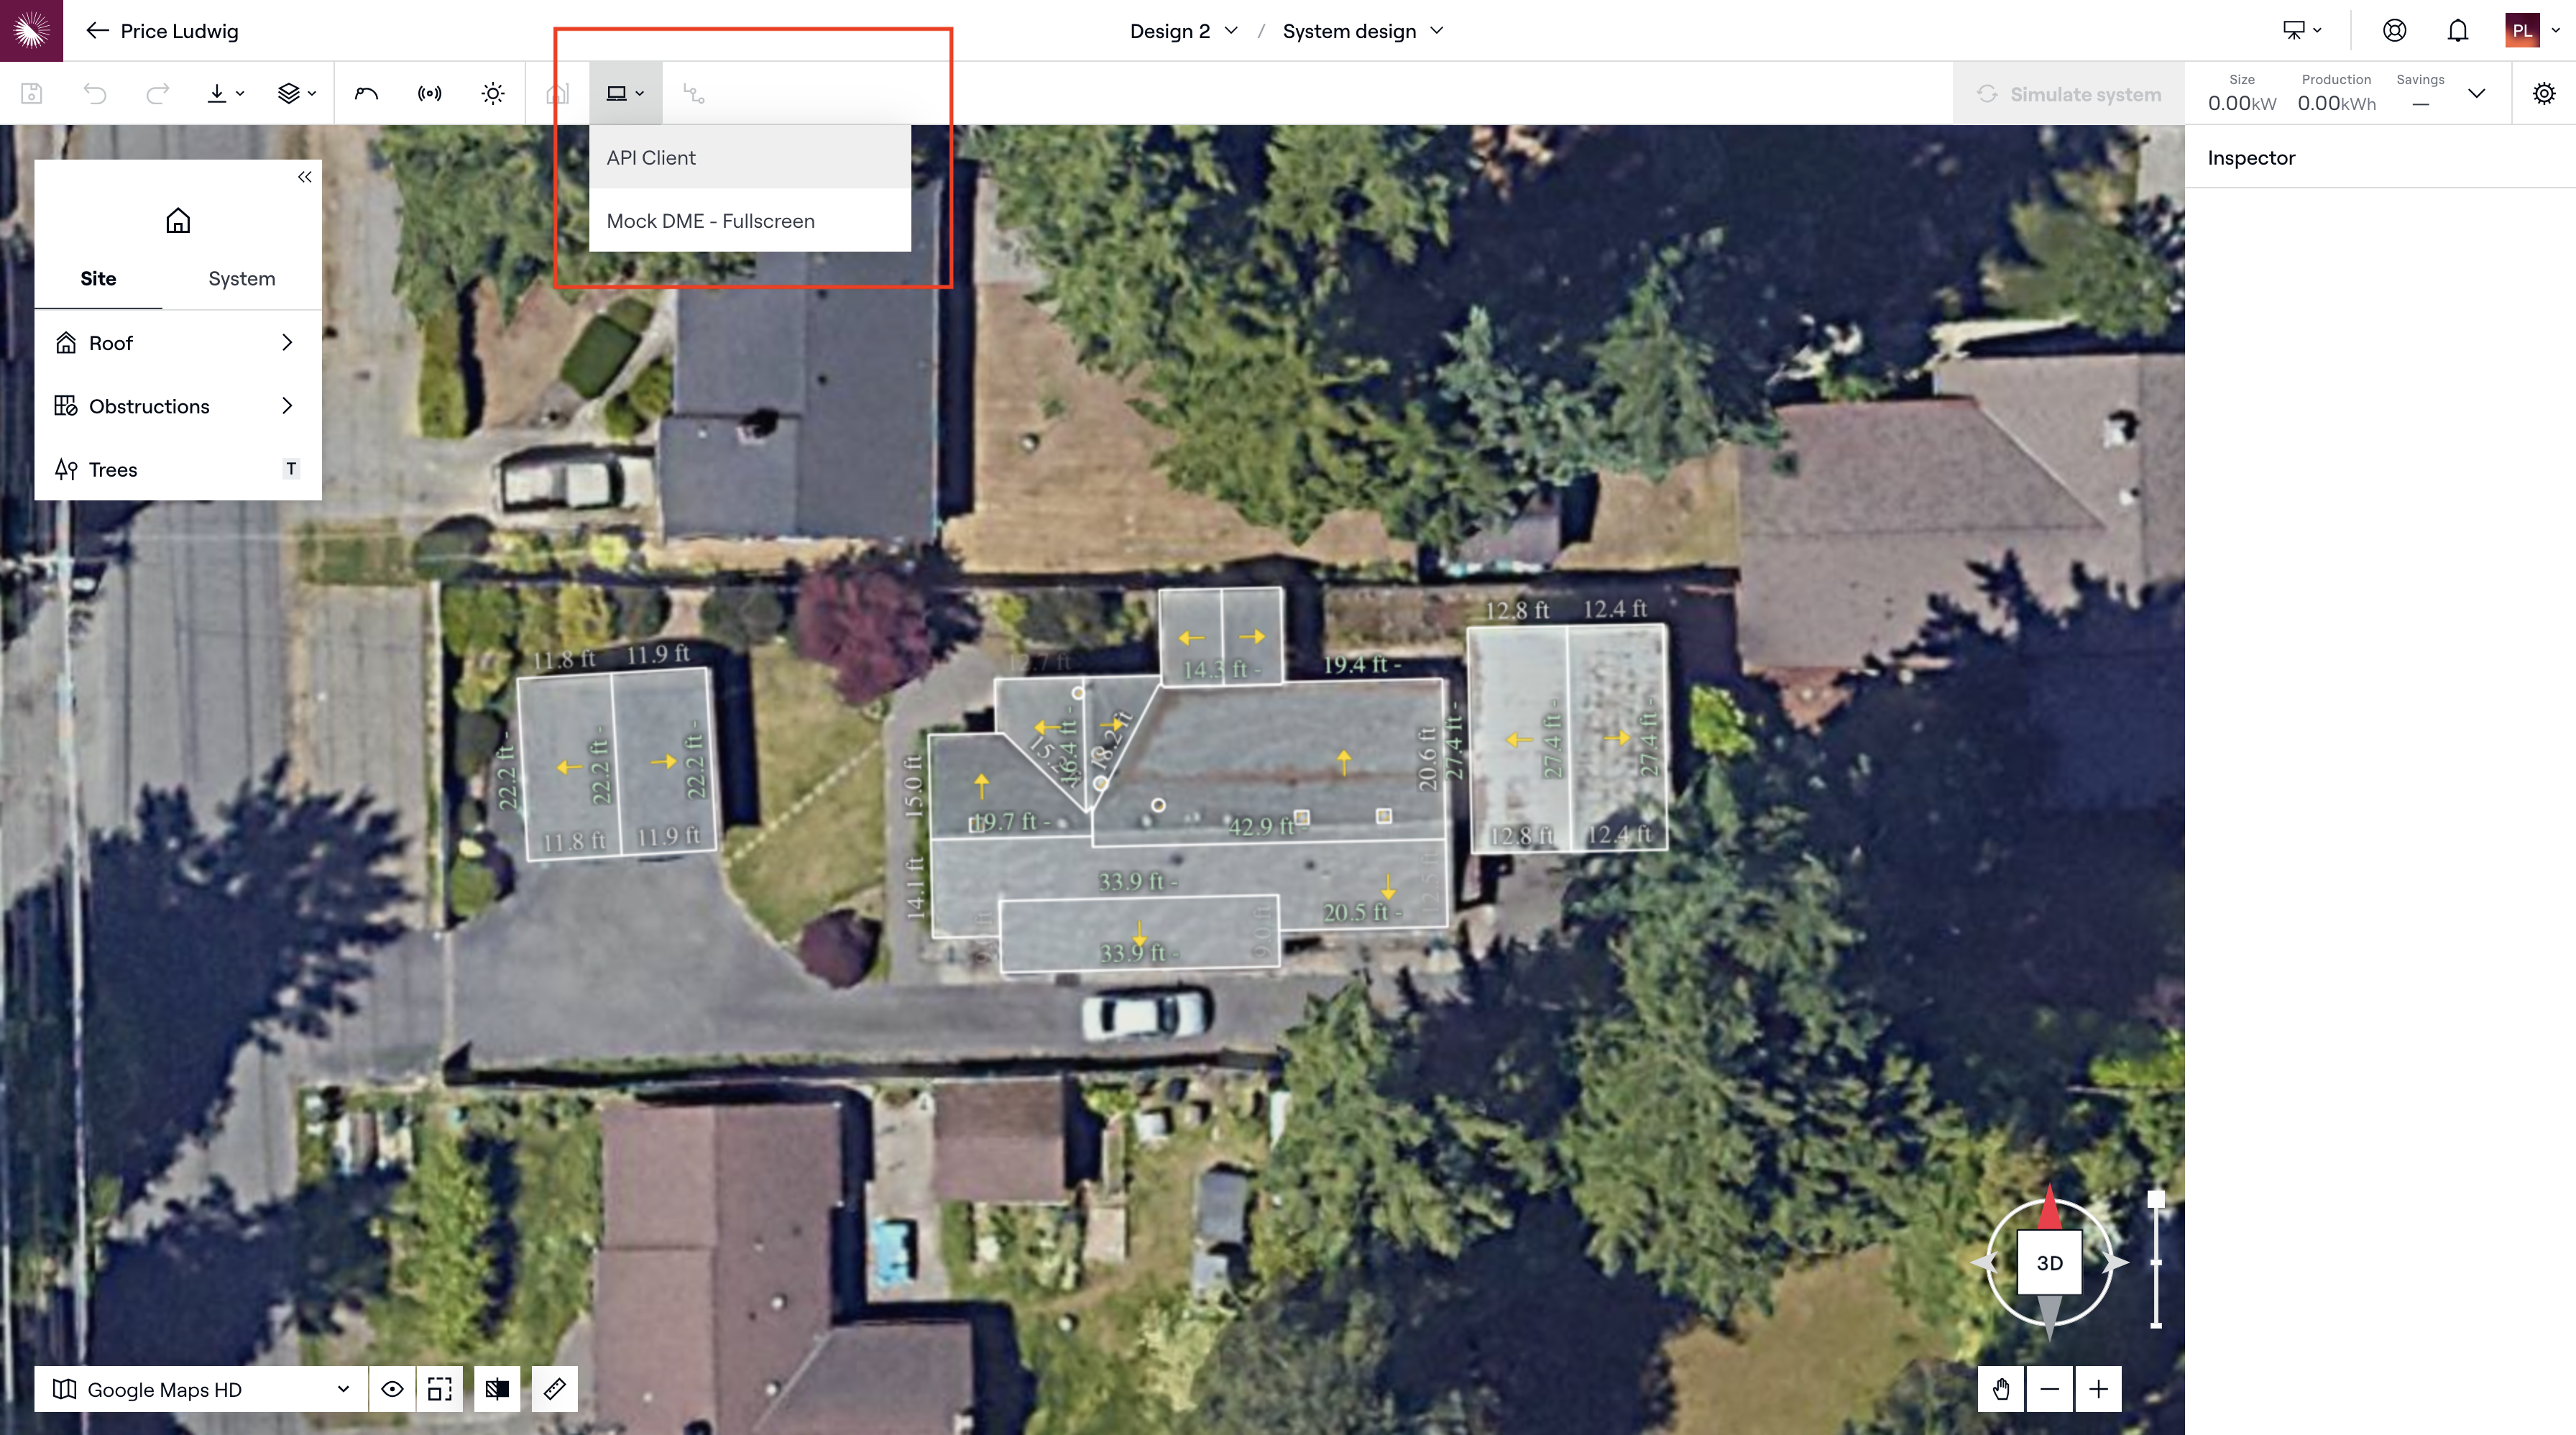
Aurora users can select a “Design Mode Extension” from a dropdown list in app. Similar to a Google Chrome extension, design mode extensions allow you to bring your custom functionality to Aurora.

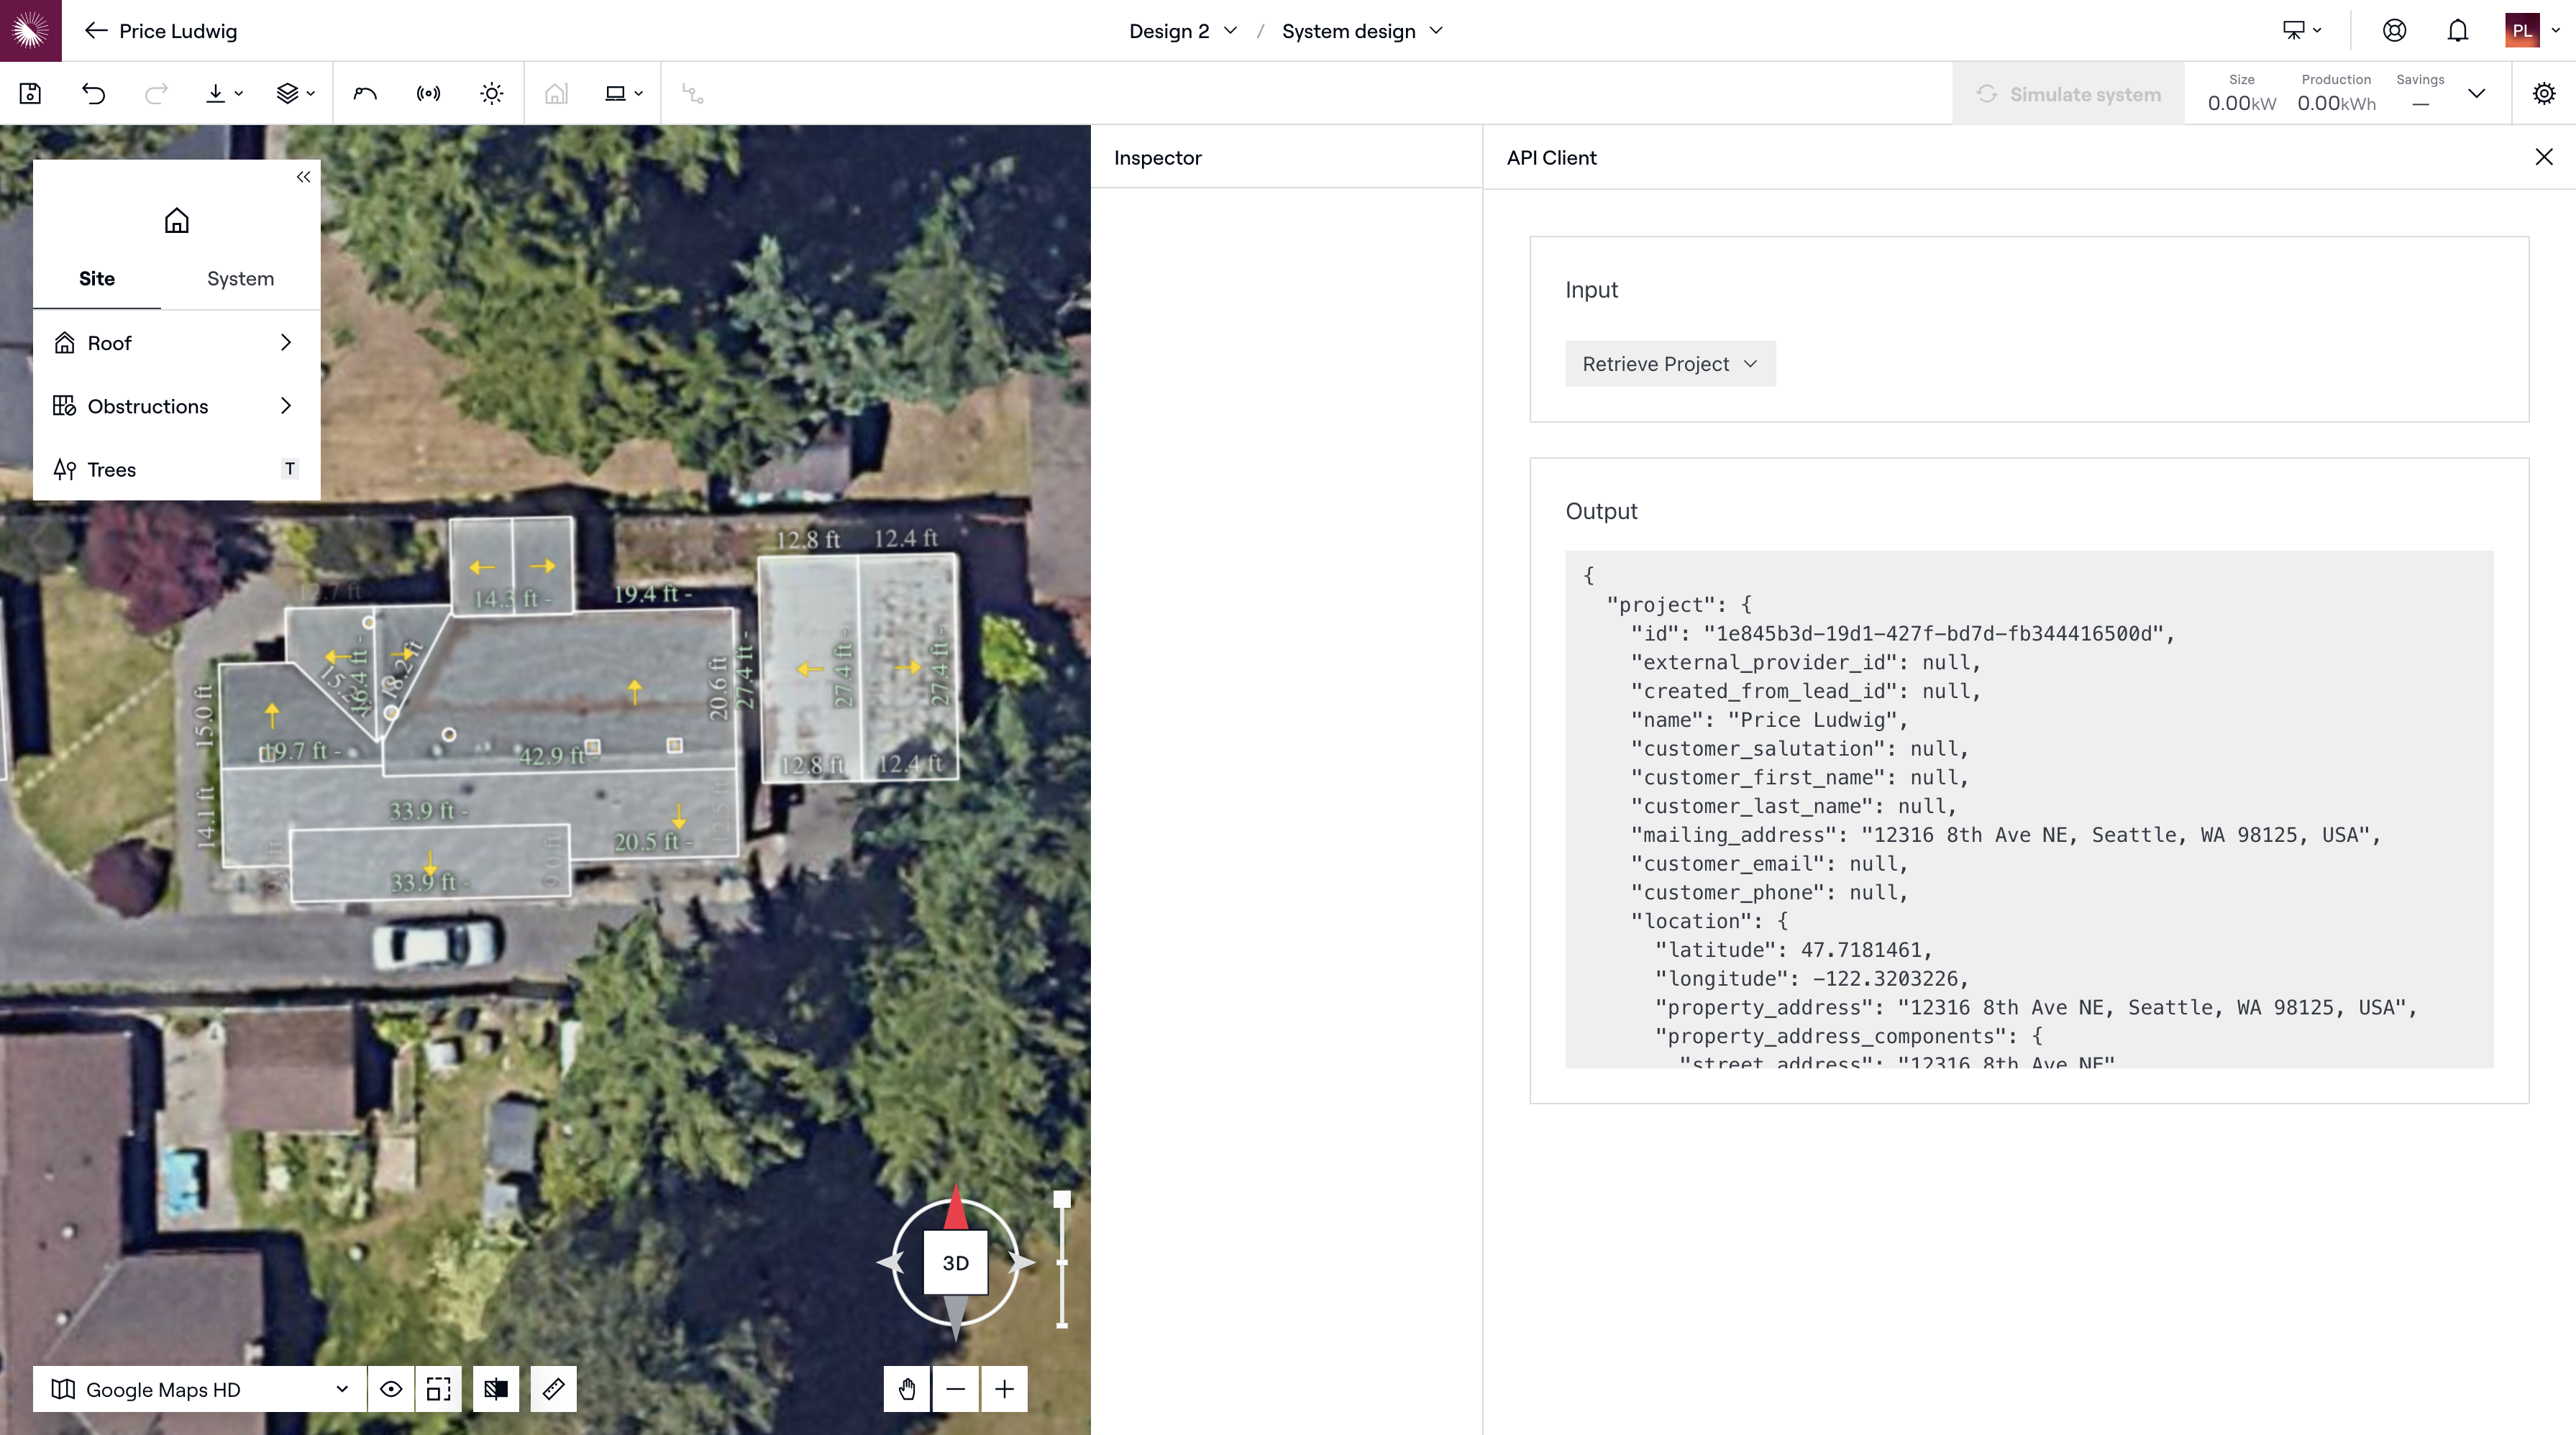
After selecting your extension, Aurora will load your app in an iframe and pass key data to your app as query parameters. Your app can leverage this information to access the Sync API and retrieve Aurora data. Extensions can be either fullscreen, which take up the entire screen, or split-screen, which allow you to see both your extension and Aurora design mode at the same time.

Split-screen extension example
Example Extension App
To learn more about how design mode extensions work, you can enable the Aurora API Client app on the “Apps” settings page. The API Client is a split-screen app which allows you to easily interact with the Aurora API and see detailed data about the project and design you’re currently viewing. While the example app only queries certain APIs, your app can leverage any Aurora’s Sync API to implement a wide variety of functionality.
Getting Started
This tutorial assumes you have already been provisioned a sandbox account to become familiar with Aurora. To get started developing in Aurora, you’ll first need an app with a public URL for Aurora to iframe. When setting up your app, read over the embedded apps page for best practices and considerations on how your app will be framed.
One Time Setup
Please provide the following to your Aurora account team:
- Your app name, which will be down in the dropdown menu pictured above.
- A tagline for your app to display on the “Apps” page (256 characters or less)
- A description for your app to display to users at enablement
- A logo image for your app (scaled to 44px height)
- The iframe URL for your app
- Whether your extension should be
fullscreenorsplit-screen
In return, Aurora will provide you with:
- an
application_idfor your app - an application key to access the partner app API
- Aurora will enable your app on your sandbox tenant
Run your app locally
In this tutorial, you’ll use Next.js to stand up an app that can be served locally and embedded. You are welcome to use any framework that works with your existing tech stack, but the steps in this tutorial may differ.
- Follow the Next.js installation instructions to set up a new project. Please note Next.js requires Node.js 18.17 or later.
- Once your project is created, run
npm run devvia CLI in your project's root directory to launch the development server - Verify your app is visible at
http://localhost:3000
Embed your app in Aurora
With the app configuration API, you can update your Aurora app configuration to point at your development server
curl -X PUT https://api-sandbox.aurorasolar.com/partner_applications/{app_id}/config -H "Authorization: Bearer {app_key}" -H "Content-Type: application/json" -d '{"partner_application_config": {"iframe_url": "http://localhost:3000"}}'You should now be able to open your app from design mode. Open a design, then select your app from the Design Mode Extension dropdown menu. Your locally running app should open and load, inside of Aurora.
Request and Display Aurora Project Data
Step 1: Set up your project structure
Next.JS separates components into server and client, and handles the communication between them. Your auto-generated app should have a src/app/page.tsx file, which we will make into our client. Replace the contents of your page.tsx file with the below:
"use client"

export default function Home() {
	return(
		<main>
			<div className="flex flex-col items-center justify-between p-24">
				<button>
					Make a sample call
				</button>
			</div>
		</main>
	)
}
Additionally, make a new file: src/app/server.tsx. When we need to perform server side operations, such as calling the Aurora API, we’ll do so in this file.
Step 2: Parse query parameters
On each load of your app, Aurora will send the following URL query parameters:
- tenant_id, as
aurora_tenant_id - user_id, as
aurora_user_id - project_id, as
aurora_project_id - design_id, as
aurora_design_id - session_token, as
aurora_session_token
To parse these, you can use the useSearchParams React hook. Add the following to page.tsx
"use client"
// Import the new function
import { useSearchParams } from 'next/navigation'

export default function Home() {
	// Call the React Hook
	const queryParams = useSearchParams();

	return(
		<main>
			<div className="flex flex-col items-center justify-between p-24">
				<button>
					Make a sample call
				</button>
			</div>
		</main>
	)
}
Step 3: Store Critical Data as Environment Variables
You should always use security best practices when handling your app key, as it provides access to any Aurora tenant who enables your app. In this tutorial, you will store your app key and app ID as environment variables only accessible on the server side of your app. From the CLI where you launched the app, run the following commands:
export APP_KEY={your_app_key}
export APP_ID={your_app_id}
Step 4: Generate a temporary token
Aurora uses an “OAuth-like” flow to secure partner app access. For more information, see Authorization: embedded apps.
In Next.JS, you will use a server side function to talk to the Aurora API. Communication with Aurora should always happen server side as to not expose any sensitive information, like API keys, to attackers.
Using the aurora_session_token value from the query parameters, and your app key and app ID saved as environment variables, make a request to generate a new temporary token. After successfully getting a temporary token, we’ll save it as an environment variable to use in later requests.
Add the following function to your server.tsx:
"use server"

export async function generateTemporaryToken(tenantId: string, sessionToken: string) {
  const appKey = process.env.APP_KEY;
  const appId = process.env.APP_ID;

  const url = `https://api-sandbox.aurorasolar.com/partner_applications/${appId}/tenants/${tenantId}/create_token?session_token=${sessionToken}`;

  const response = await fetch(url, {
    method: "POST",
    headers: {
      Authorization: `Bearer ${appKey}`
    }
  });
  const data = await response.json();

  if (response.status == 200) {
    process.env.TEMPORARY_TOKEN = data.token.bearer_token;
  } else {
    console.log("Error generating temporary token.")
  }
}
Step 5: Retrieve Project Details
With IDs parsed in step 1, and the temporary key generated in step 2, you can now access the Aurora Sync API. Let’s add a new server side function to server.tsx to query the Sync API:
export async function getProjectDetails(tenantId: string, projectId: string) {
  const tempKey = process.env.TEMPORARY_TOKEN;
  const url = `https://api-sandbox.aurorasolar.com/tenants/${tenantId}/projects/${projectId}`;

  const response = await fetch(url, {
    method: "GET",
    headers: {
      Authorization: `Bearer ${tempKey}`
    }
  });

  const data = await response.json();
  return data["project"]
}
Step 6: Bring it all together
Finally, let’s add some text to view our API response and call our server side functions. To keep track of the API response, you’ll also need to add a React state variable. Add the following to page.tsx
"use client"
...
// Import useState from react, and our server side functions
import { useState } from "react";
import { generateTemporaryToken, getProjectDetails } from './server';

export default function Home() {
	// add a state variable to hold the API response
  const [apiResponse, setApiResponse] = useState("");
  ...

	// add a new function to call the server side functions
  async function retrieveProjectDetails() {
    generateTemporaryToken(queryParams.get('aurora_tenant_id') as string, queryParams.get('aurora_session_token') as string);
    const projectDetails = await getProjectDetails(queryParams.get('aurora_tenant_id') as string, queryParams.get('aurora_project_id') as string);
    setApiResponse(JSON.stringify(projectDetails, null, 2));
  }
}
Lastly, call the new function when your button is clicked and display the response
export default function Home() {
	...
	return (
    <main>
      <div className="flex flex-col items-center justify-between p-24">
        <button onClick={() => retrieveProjectDetails()}>
          Make a sample call
        </button>
        <textarea
          className="bg-gray-900 text-white p-4 m-4 w-full h-64 overflow-y-scroll"
          value={apiResponse}
          readOnly
        />
      </div>
    </main>
  );
}
You should now be able to press a button in your embedded Aurora app and display details on your project.
Develop your App
Once you’ve successfully made calls to the Sync API, you should develop your app to your use cases. Explore the Sync API docs to find endpoints that you need to complete your app.
Considerations
- For development, Aurora will give you access to all API endpoints. Before releasing your app for general use, Aurora will limit your app to only access scopes it needs in order to protect customer data.
- If you need to change your name or iframe URL during development, you may use the app config API.
Updated 9 months ago